Are you one of those guys who are arguing with other musicians about what that effect on guitar, vocals or on drums (Ian Paice, Deep Purple’s drummer loves to start his drum solo with a snare roll and a flanger effect on his entire drum kit) is? It’s sometimes even applied to the entire mix. Is it phaser…or flanger? We know, usually, it could lead to an eternal debate. Because of that, we are going to demystify this phenomenon called flanging.
First of all, the flanger is an effect which is most commonly correlated with the 60s, 70s, and 80s, although is still popular and it found its way in modern music of any genre. And by any genre we mean from funk, rock, disco to heavy metal music.
What Is Flanging?
In simple words, it is an effect which is created when the same two audio signals are blended while one of the signals is delayed. To properly achieve the flanging effect, the delayed signal should be in short but constantly changing amount which shouldn’t pass more than 20 milliseconds. This kind of mixing two identical signals will produce a sweep filter effect while varying the delay time force it goes up and down in the frequency spectrum.
The original tape flanger sounds a bit different from software plugins, effect units, and pedal recreations. It can be explained as a combination of flanging and phasing since not only is flange signal delayed, but the reaction of the tape and tape head have injected phase changes at different frequencies in the signal also.
According to the “traveling direction” of the sound wave, flanging can be divided into positive, negative and through-zero flanging.
History Of Flanging
What is known about this effect is that it was discovered, of course, by accident, in the early 1950s while Les Paul was playing with and studying phasing. With the help of his old variable-speed record players (turntables, gramophones), the very first variation of phase shifting is born.
The additional improvement of the flanger effect can be associated with Ken Townsend, the Abbey Road Studio’s audio engineer. Ken devised the very first automatic (artificial) double-tracking (ADT) system which takes the original signal from playback while making the other (same) audio with a slight offset in it. With this process, there are two identical sounds and if you are changing the speed (delay, offset) or frequency of the second signal you’ll be able to create flanger.
It can be said that John Lennon was credited with ADT also, because he was too lazy to record his vocals twice so Ken had to do something about it. Historian Mark Levisohn claims that John Lennon is the first who described this technique “flanging” and the term is still in use today, for more than 50 years. In 1968, Warren Kendrick invented a system to accurately manage flanging with two stereo Ampex tape recorders.
This process is performed by recording the completed music track simultaneously on two tape recorders and after that, replayed with both decks at the same time. This playback (from these two recorders) is recorded with the third tape recorder while the recording engineer slows down one of the playbacks by pressing lightly on the “play reel”. The playback of that tape continues very short behind the other tape. By pressing the play reel at the other deck the effect sweeps back and the decks are proceeding synchronized again.
How Does It Work?
This awesome effect can be created with delaying the original’s signal copy consistently with all of its frequencies. When you have this signal duplicated and short delayed, usually from 1 ms to 20 ms, you need to make this delay moveable if you don’t want static flange. LFO (Low Frequency Oscillator) can help you greatly with this since the key to the classic flanging effect is having LFO set to annually manage the delay time. While the delay time is sweeping back & forth, the notches are annually moving, and the filter tone simply shifts with the changing jagged frequencies, creating the Flanging effect. You, as a listener, will be able to hear a swish, swoosh or jet plane like sweep sound.
The flanger is an effects unit that creates a flanging effect. It can be found in the form of a pedal (most commonly used for guitar) or a simple rack mount effect unit. The character of the output signal is regularly returned to the input with changing offset time, creating a resonance effect that further enhances the intensity of the notches. The feedback phase is sometimes inverted, creating a different variation of the flange.
Either analog devices are more popular and loved among musicians and audio engineers most software plug-ins provide much more user control. First of all, many of VST flanger’s sweeps can easily be synced with the session tempo which is a great advantage. Not only VST flanger plugins have options like initial frequency of sweep, resonance, but there are also much more features and parameters with which you have more creative potentialities to explore the whole new world of the digital sound processing.
What Does A Flanger Pedal Do And How To Use It?
Most flangers work in a somewhat simple way – copies the original signal with a slight delay. Many of them offer just managing of sweep rate but usually, have controls for delay time, feedback, and mix also. With mix knob you can balance levels of input and copied (flanged) signal.
We suppose you want to use flanger pedal with an electric guitar. Not necessarily, you can use it with vocals, synth, bass, with any instrument you like. But lets, for example, explain using with the guitar since is most commonly used for that purpose. First, make sure all of your equipment is turned off od muted. You don’t want any unnecessary noise or loud pops. It can also harm your equipment.
If you are using only flanger pedal, you’ll need 2 audio cables. One from guitar to pedal, and other from pedal to amplifier or mixer (depending on what you are going to use). If you are planning to use more than one pedal you will need more cables. No worries, it is not expensive, these are short cables with which you connect one pedal to another forming what is called chain. These cables are also called patch cables. Now let’s back to work.
All you need is to plug the one side of the instrument cable to your guitar, and the other side of the cable to the input jack of the pedal. Since most of the guitar pedals have input and output jacks only there shouldn’t be much confusion. Connect another cable from output of your pedal to input on your amp or mixer and you can turn it on. Now when you are connected, you are ready to step on your stompbox and play.
Where To Put Flanger Pedal In The Effect Chain?
One of the many concerns of almost every guitarist, especially a novice, is where to put a pedal on his pedalboard. If you’ve been in the music world for a while as a guitar player, chances are high that you have a few different stompboxes. The question is how to hook them? Maybe you already did and you’ve got noise, hum, or bad feedback… Everything in effect chain should have its own place and the same rule is for a flanger.
According to many guitarists, the best place to insert modulation effect (which include Flanger) in the chain is after distortion and/or compressor and before reverbs and delays. On the other hand, this is not necessarily, you can distort flanger, yet you should be very accurate with setting parameters since you could get very strange sound.
Keep in mind that this is a matter of taste. Some guitar players favor the more initial sound quality of flanger effect patched into an effect chain, especially because the flanger after distortion can help decrease overall noise.
If you plan to use more than one mod effect at you effect setup there are no worries if you place flanger before phaser or chorus after flanger or like…
Keep in mind that you should think about placing gate after flanger. Flanger pedal can produce constant “whoosh” sound even if you don’t play guitar.
Don’t take our word for it, like everything else in music and art in general, no rule has to be followed 100%, so … experiment!
Flanger Pedal Control Knobs
All the flanger pedals regularly come with two to four parameter knobs. Since, as for any other devices, there are many manufacturers of flanger pedals and because of that, you can find different parameter names. Don’t let this confuse you.
For example, on one pedal there will be parameter named “RATE”, on the second pedal the same parameter will be labeled as “SPEED” or even maybe “FREQUENCY”.
- With this parameter, you will be able to coordinate the frequency of oscillations or waves which you can hear as they “move” within your signal.
The same thing applies with a “WIDTH” which is also labeled as “RANGE”, “DEPTH” or “DEPTH INTENSITY”.
- This parameter regulates how much of dry or wet signal you want to be sent to the output.
“DELAY” parameter can be found as “MANUAL”, “DELAY TIME”, “FLANGING EFFECT” etc.
- With this parameter, you will be able to control the delay of the copied signal.
And there is also additional parameter knob “RESOLUTION” which means the same as “RES“, “COLOR“, “REGEN“, “REGENERATION“, “FEEDBACK“…
- With this parameter, you will be able to take some of the wet signals and make it run through the LFO whit which you can considerably enhance and color your sound.
On some pedals, you can find switches for whether the feedback will be + positive or – negative, and LFO filter types log, lin, thru.
When you get in front of the flanger, you should be already familiarized with these terms so you can handle the stompbox more easily.
What Flanger Pedal Is Right For You?
We know that choosing a proper piece of gear that suits your needs is almost always a headache. What if this, what if that…This pedal has this, that is better because of that and so on. Because of these concerns, we decided to help you a little with your decisions. It doesn’t have to mean that the most commonly used pedal will fill your desires and needs. Maybe you want to stand out, maybe you are seeking for something totally different.
Some of the most popular pedals are Boss BF-3 (and older version BF-2), TC Electronic Vortex, Electro-Harmonix Electric Mistress, Donner Jet Convolution, MXR’s flanger stompboxes and so on…
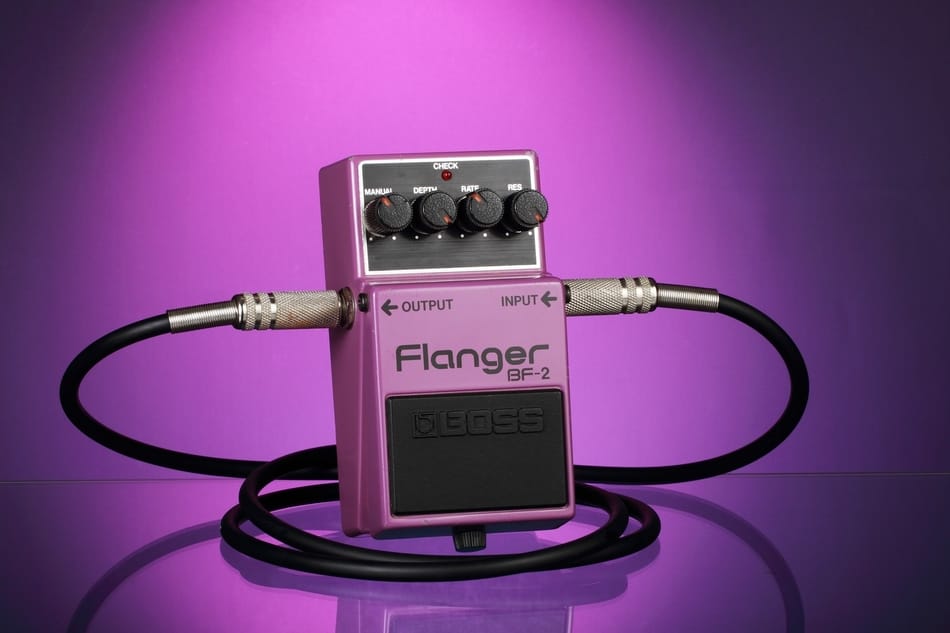
Boss BF-3
Without further discussion, the violet BOSS BF-3 pedal and its predecessor BF-2 are perhaps the most commonly seen flanger pedals in the pedalboard of any guitarist.
Without a doubt, these are heavy-duty pedals that will last you many years. They can be powered by a 9V battery or AC adapter (which is always, at least in our opinion, a much smarter choice). It has two inputs, guitar, and bass IN. We should point out that if you are using guitar input jack, the bass input jack will be disabled.
There are four standard parameters with which you can manage depth, rate, manual, resolution and one additional parameter labeled as “mode”. There are the standard and ultra mode. They only differ in that ultra mode enhances the flanging effect.
With these powerful pedals, Boss proved that they have sturdily adaptable equipment which combines old, warm sound with new impressive features. No matter if you are a beginner or a professional, these pedals are always a great choice and will not let you down.
TC Electronic Vortex
At the first look, the TC Electronic Vortex pedal may look rather usual. There are standard 4 parameter knobs for controling, speed, depth, feedback and delay time. It has stereo and mono inputs and outputs that make great double amplifier adjustment possibilities.
This stompbox can without any question be part of every guitarist pedalboard and satisfy his needs for flanging effect.
This flanger pedal supports a powerful feature with which you can download pedal presets from many World famous guitar players. This feature is called TC Electronic’s TonePrints which makes this pedal simply incredible.
Another advantage of this pedal and also brand TC Electronics, in general, is that they take good care with their “True Bypass”. They believe that pedal, when bypassed, shouldn’t affect the last signal. We totally agree with this.
Electro-Harmonix Electric Mistress
Mike Matthews founded Electro-Harmonix back in 68′ which produces the very first stompboxes. This one is quite simple 2 in 1 pedal and we didn’t just mention it for no reason. First, it looks exceptional, we love it! Second, the Electro-Harmonix Electric Mistress offers you to mix the flanger and chorus effect at the same time. With this feature, you’ll be able to make some awesome sounds with your guitar.
It can be powered, same as most pedals, with 9V batteries or AC adaptor and has stereo output. We won’t discuss more this pedal we’ll just mention that David Gilmour (Pink Floyd) used this stompbox and that should be sufficient proof of its superiority.
Donner Jet Convolution
This pedal is definitely the cutest and the best value for money flanger pedal on the market. It is compact, well built, light but equipped with a lot of features. First thing you notice at this little stompbox is that big rate knob. It is really oversized comparing to other knobs. That huge rate knob allows you an easy tuning. The color parameter on this pedal will supply reg or feedback while the range knob can provide you with more warm, natural sound either metallic, psychedelic sound.
Switch on this pedal is used for automatic LFO or “normal” mode. On most flanger pedals the LFO is set to produce an automatic sweep sound.
MXR
What to say about this brand. Any flanger pedal model to choose from EVH117SE, M117R, M152, EVH117 you won’t regret. Apparently, Jim Dunlop and his associates knew what they were doing. The MXR products, with their cool design attracts attention. MXR’s relationship with Eddie Van Halen is legendary, and Van Helen’s influence into these flanger pedals is impressive. If you’re looking for flanger pedal that is one of the big names in the industry, one of these pedals could be the right for you.