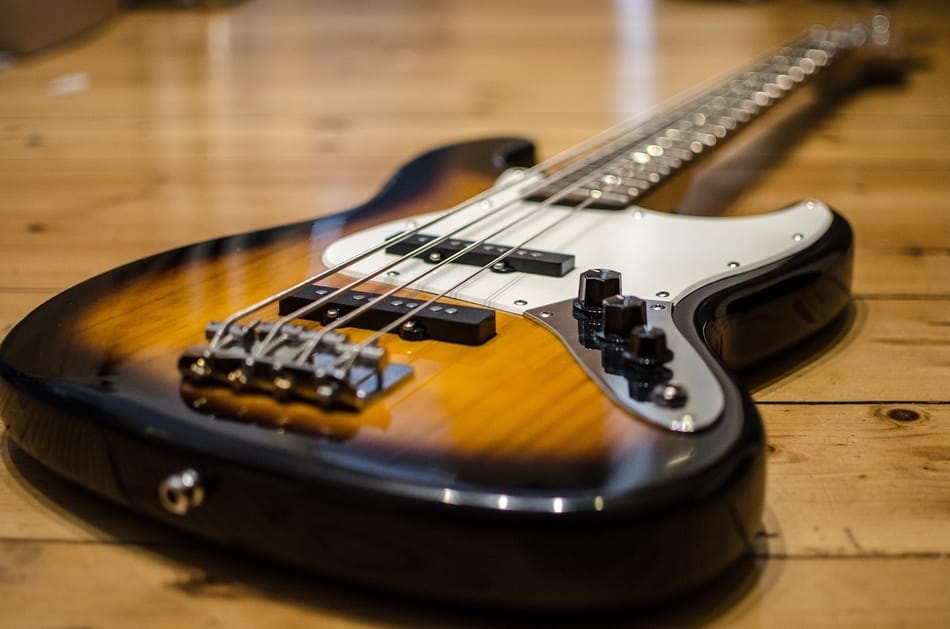
You may be wondering what gives that incredible power and energy to every song ever made. Is it guitar, synth, drums? Yeah, of course, all of these too, but the bass guitar is an instrument that makes that perfectly smooth connection between the kick drum and other instruments in the mix. Either is bass guitar or synth bass, they are usually producing the deepest notes in musical range. In partnership with the kick drum, the bass is the only instrument that is dominating in the low-frequency range. Therefore, these two must be perfectly fitted one with the other. They need to breathe together and make that perfect union which is the foundation of every song.
You probably know that every instrument has its tone. The same thing is for bass, not every bass is the same and not every bass will sound the same. Many factors influence its specific tone and resonance like the type of wood of which it is made of, pickups, even your playing technique.
So, stop looking for a magic formula that makes your bass sound awesome. You’ll just waste your time, you won’t find it. We can help you fully understand how to make your instrument sound the best it can. With the knowledge that we’ll share with you in the next lines, you’ll be able to find a solution for every situation (live performance or studio recording). Also, you’ll be capable to find the way to make your bass guitar shine in the mix instead of being in the mud.
Let’s get on to the basics of EQing the bass guitar. What would be the main frequency ranges for the bass!? What should be cut, and what frequencies should be boosted? Let’s get to the first step of EQing – low cut or also known as HPF.
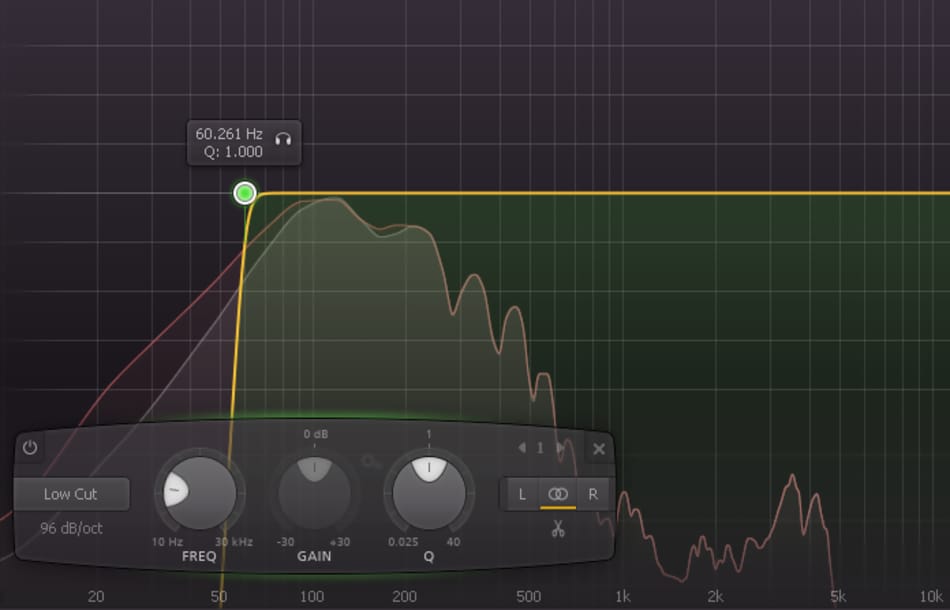
Low Cut (High pass filter HPF)
Maybe you are one of those who are wondering what is a “lo cut” (low cut) or “HPF” on the mixers. Depending on the manufacturer, both terms mean the same – high pass filter. Both things will do the same if you press that button. It will cut all the frequencies below 80 Hz (or 75 Hz) – again, depending on the manufacturer’s choice. If you own a digital mixer, know that you have the huge advantage of HPF. Unlike analog mixers that can only cut frequencies below 80 Hz, with the digital mixer, you will be able to choose to have the HPF cut everything below whatever frequency you choose. For example, anything below 60Hz, or 72Hz, whatever suits you. Everything below 60Hz for bass is completely unnecessary (and for other instruments also). So, the first step would be to cut everything below that, and after you do that, you can head on to further adjustments.
Bass guitar frequency areas
60 Hz – 200 Hz:
This is the central bass field. Increasing some of the frequencies in this area will add power and make the low end full and mighty. It will enhance the bass range with depth and body. Keep in mind that this area could also be quite problematic. If you play around with the equalizer, you may not notice a significant difference in sound when you turn up 60 Hz. Be careful when boosting around that frequency, you can very easily load the mix yet not achieve anything. First, to be able to hear that frequency, you will need a subwoofer or quality headphones with good bass response. So, if you don’t have subs on the stage, don’t try to pull 60 Hz out of the smaller speakers. You won’t get it you’re just gonna jam the kick drum. Depending on the shape, size, and materials of the room (for example, glass and ceramics), especially if these surfaces are flat, non-acoustic, sound distortion in the form of sustain may occur. As sound waves bounce off flat surfaces and there is nothing to break them, the sound will spread throughout the room. So, because of that, we need to pay attention especially to the…
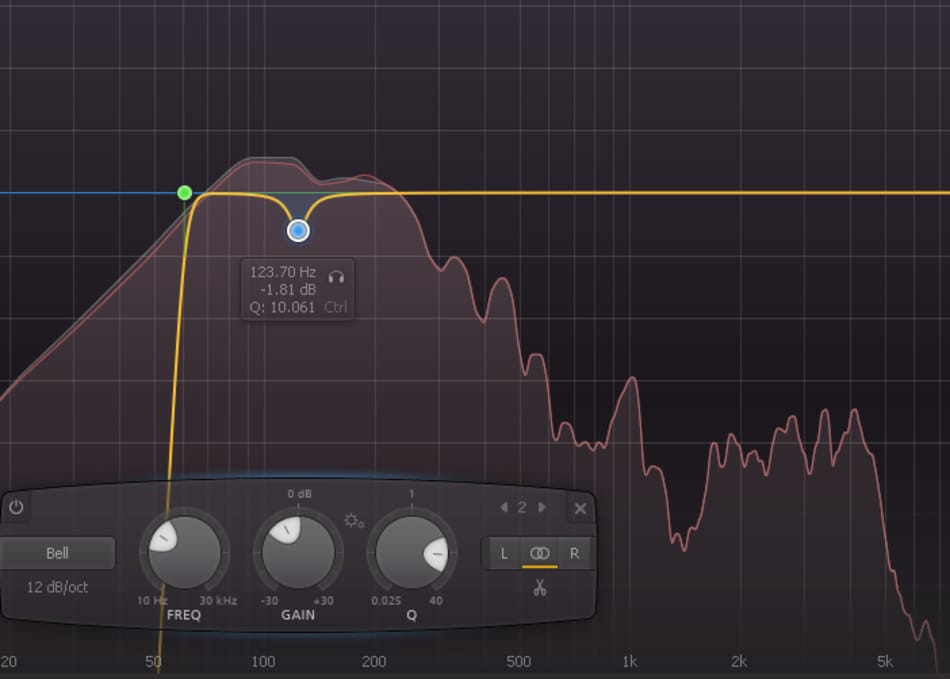
100 Hz – 150 Hz:
This is the area where usually some of the problems occur and sometimes it is a very difficult section to control. You’ll be able to get rid of those frequencies, which will blow your head after a couple of minutes playing bass on stage, with parametric or graphic equalizer, only. If you are trying to reduce some of these frequencies on the mixer, do it carefully because you can easily lose the essence of the sound if you over-cut. Believe it or not, in 90% of cases when something strange is happening, when you can hear some strange sound which fatigues your ears in any room is a B note (B2). Even when you place your hi-fi speakers near the flat wall or in the corner, that B2 will always somehow be highlighted. Really weird. That B tone is exactly 123.5 Hz. Try to find that frequency on your equalizer and cut it to some point. You’ll instantly notice the difference, the warmth and softness that your bass guitar will produce. 133.2 Hz and 141.2 Hz can be really annoying and problematic frequencies also. They are usually caused by guess what…the room.
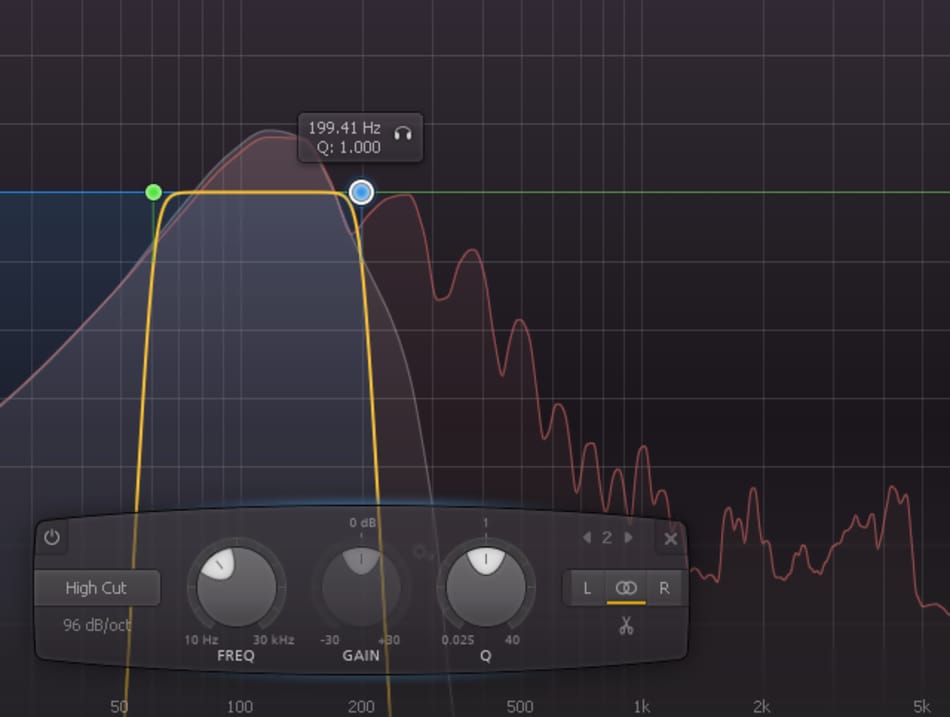
200 Hz – 500 Hz:
This range is usually called “muddy” area. This phrase is not only used in bass guitar EQ terminology but for other instruments as well as vocals. Some people usually cut somewhere between 250 Hz and 300 Hz with the master equalizer on the mixer during live performance justifying that it is the room that creates the mud. It is true, to some point. The room adds the color to the sound, that is obvious. But actually, the range from 200-500 Hz is the place where almost all of the instruments meets each other. Just think, the bass drum is there, the snare too, the toms, the guitar, the vocals, everything. If you notice that your bass guitar lacks some clarity and definition, just cut somewhere between 200-300 Hz, but don’t overdo it. If you cut it too much, you could end up with thin bass sound. True that cutting somewhere around 200-300 Hz will reduce a boxiness in your sound, however boosting around 400-500 Hz will increase the presence of the bass while playing at the same time as the kick drum.
500 Hz – 1000 Hz:
This is the area where mid frequencies are dominating. Increasing some of dB somewhere around 500-700 Hz will provide you with an advantage over a kick drum. You’ll be able to hear exactly what notes are you playing, unlike low-end frequencies where you can hardly hear what the note is. Frequencies throughout 700-1000 Hz will supply you with even more note definition, and attack. For example, if the kick drum is too boomy, the bass guitar which sounds the same (boomy) will be just surplus. In that case, you can use the joker and pick up anywhere between 500-1000 Hz (depending on your bass) to float in the mix and work well with the kick drum. Use your ears and find that sweet spot where your bass will sound just the way you want it.
2.5 kHz – 5 kHz:
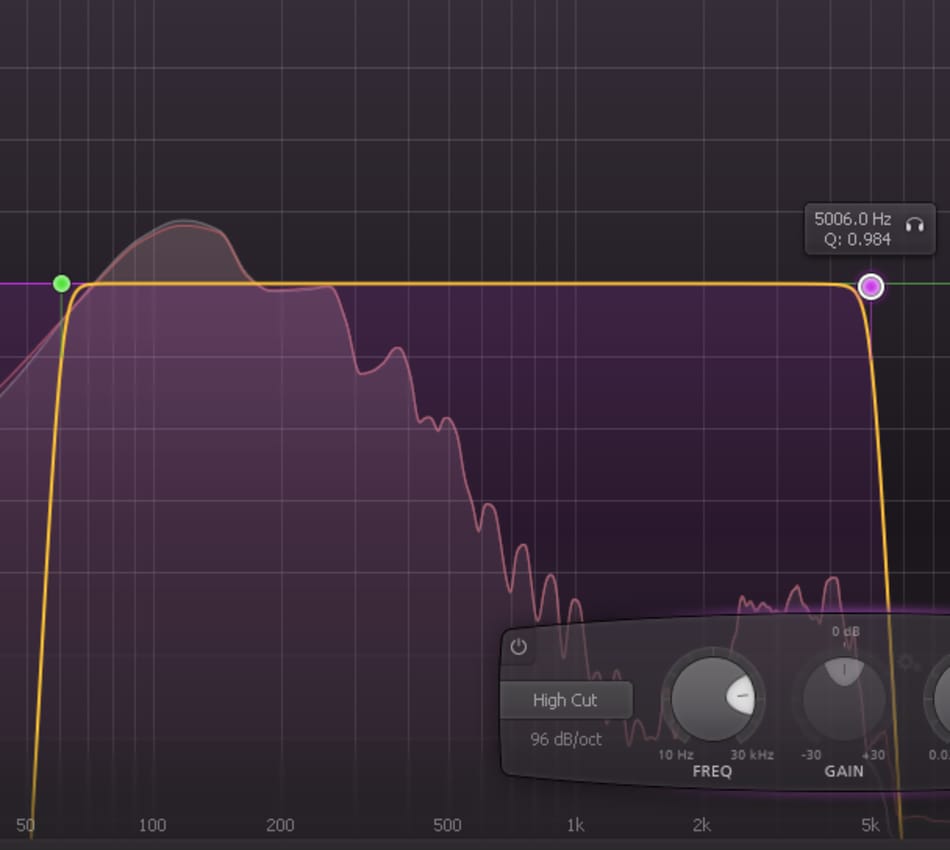
Even more attack! Boosting frequencies in this range will give your bass more presence, snap and brightness. But, not everything is as wonderful as it looks. Boosting frequencies in this area can in abnormal amount, raise the noise of the bass strings. In this case, you must make sure that if you play with the pick you can get a lot of string noise. If you play with the fingers the position at which you will stroke the strings (closer to the bridge) will enormously influence the sound of your instrument. The clarity that raising these frequencies gives you can also be a disadvantage. Yes, you can slap the strings and be a cool guy in a band, but on the other hand, you need to be a really good player and play every note precisely on time because if you don’t, you can annoy your colleagues on stage, especially the drummer, as well as the audience. The frequencies above 5 kHz for the bass guitar are not that important, so you can feel free to cut it. For that job you can use LPF (low pass filter) and set it to the 5 kHz.
EQing live performance VS studio recording
Should the settings for live performance and studio recording be the same? This question not only teases you but many audio engineers as well. Logically, we should get the most out of sound into a live performance by comparing it to CD quality, but there are many obstacles. Several physical obstacles, in fact. Wondering what we mean? Let’s simulate the worst case scenario.
Imagine being in a sound check. You are standing at the stage, the place where you are going to perform is empty now, there are also unfamiliar PA system and old school mixer (if digital, than perfect). What should you do? First look around you. Are you in the room with a lot of flat surfaces, such as ceramics and glass walls, for example. Ouch! Boxyness and infinite reverb here we come! Are there any subwoofers, and what are their size!? With two 15″ inch subs, hardly that you can fill the room with the good powerful bass sound if there are 500-1000 people. In this situation you definitely won’t be able to chase CD quality of your instrument.
We recommend that you rely on your ears and apply a few practical tips to help you make the most of it. Since the room is empty, there will be a lot of reflections. The frequency of these reflections will depend only on the room shape and acoustics.
First, if you have a digital mix, or an external EQ (we hope that you have):
- Cut everything below 60 Hz, even 70 Hz or 80 Hz depending on the subs and the room.
- Reducing around 100 Hz -124 Hz and some between 230 Hz and 300 Hz will certainly help to eliminate strange sounds and bass reflections.
- If you want more bass sound, which will give power to your mix and feed subs, simply boost around 60 Hz – 200Hz. Amount of level given to the subs will depend on their crossover.
- Adding frequencies around 500 Hz – 700 Hz will help you stand out and provide you with tone definition.
These practical tips can briefly help you clear up a little and pave the way for your bass in live performance.
What about the studio recording?
Things with studio recording are much simpler. Suppose you have adequate equipment. By adequate equipment, we mean decent pair of studio headphones, monitors, PC or laptop and of course, the proper room acoustics (the main problem with the bass frequencies in the room is caused by corners, which is why we recommend bass traps).
Now you’re ready to nail the sound of your bass. With decent monitors, with a frequency range of at least 50 Hz to 20 kHz, you will be able to hear what your bass is missing or what frequencies make it muddy and undefined.
Better yet, with the studio headphones, again, decent pair, you will be able to hear the tiniest details of your bass and make it sound like never before. With the help of the number of VST preamps, equalizers, compressors and, you are allowed to simulate various bass preamps, to find and tweak any frequency that is problematic or may be missing and balance the dynamics of your bass track. All of these things can easily make you sound professional, however, you need to learn how to use them properly.
Bass guitar and kick drum interaction
It is not just that they need to be played at the same time, that the bass must accompany the bass drum, and blah blah, all the other stuff you heard on street or read on the internet. That they have to work and breath like one…It goes without saying. But how to make that? What we should do if we are speaking about sounding, about making them flow together smoothly through the mix without disturbing each other and overloading the mix. Since they both do their jobs in the same frequency range, a stable yet smooth connection between them must be found. Don’t let them competing for the lead in the mix, let them operate together. We can achieve that with simple EQing.
We advise to EQ the bass guitar and bass drum opposite one from another. Let’s say that your bass drum works the best when you boost somewhere between 60 – 80 Hz. If bass drum is taking that space in the mix, then you should decrease that frequencies at the bass channel. If you assign, for example, +3 dB to the kick at 70 Hz, and +4 dB to the bass at 70 Hz, you’ll get nothing more than +7 dB at 70 Hz in your mix. That means that low end is already overcrowded. A simple calculation, right? What about low mid – mid frequencies? If you like the sound of your bass guitar when, for example, 600 Hz is boosted, immediately cut that frequency to some point on the kick drum. That is the way how you can make enough space for kick and the bass. The matter of personal taste is also essential, so find a match between our tips and your taste and you will achieve a great sound you are seeking for.
Bass guitar compression
It is not actually necessary, however, compressing the bass can truly serve you with improved dynamics. You are not a robot and you can’t play perfectly every note at the same level, the compressor can help you smooth the dynamics of your playing. Also, you’ve may notice that sometimes a certain note is stronger than others. That can be leveled out with EQ and compressor. So if you understand how it works and if you know how to set it up properly, it can be of significant benefit to you. Here is something to start, but don’t get attached to this, feel free to experiment and find your own setup. Set the “attack” to a modest level, set “release” to fast, set the “ratio” to 4:1. After setting all, start playing your bass and bring up the gain knob to some point till all notes can be heard evenly. This is a basic method on how to setup compressor.
We covered every aspect of how to make bass sounds noticeably better in the mix. If you applied some of the tips we mentioned above and you still don’t like the sound read again, you must have skipped something.

One Comment